RPA Connect
English
English
  • Form Design
    • Quick Start
      • Login to RPA Connect
      • Creating a Form
      • Workspace Environment
      • Designing a Basic Form
    • Property Assignment
      • General Properties
      • Appearance
      • Validations
        • Advanced Validations
      • Behavior
        • Advanced Behaviors
    • Comprehensive Form Development
      • Text and Numeric Fields
      • Date and Time Fields
      • Option Selection Fields
      • Other Input Fields
      • Tables
    • Using Common Resources
      • Resource Upload
      • Resource Utilization
    • Workflow Configuration
    • Advanced Options
  • Administration
    • Admin App
      • Accessing Admin App
      • User and Group Management
      • Workspaces
      • Roles and Permissions
    • Integration with Microsoft Entra ID
      • Synchronization Authorization
      • AD Group Management
      • Microsoft Teams Notification Configuration
  • BLUEPRISM
    • Connection with BluePrism
      • Creating an Authentication Credential
      • Generating a Public Form Instance
      • Querying Template Instances
      • Other Actions
        • Instance-Linked Actions
        • File-Linked Actions
        • Stage-Linked Actions
      • Additional Information
  • INTERACTION CHANNELS
    • Instance Management in Teams and the Portal
      • Interface and Common Functions
        • Home
        • Submissions
        • Inbox
      • Activity in Microsoft Teams
      • Portal Features
Powered by GitBook
On this page
  1. Form Design
  2. Property Assignment

Validations

PreviousAppearanceNextAdvanced Validations

Last updated 4 months ago

In the Validations section, you can set various conditions that the entered data must meet to be considered valid. By configuring these parameters, you can anticipate different response options and minimize the risk of potential errors, such as a code exceeding the allowed character limit.

In general, the basic validations you can set are:

Property
Characteristics

Min

Refers to the minimum acceptable value for that field and is entered as a number. The type of value varies depending on the field; for example, in text fields, it refers to the minimum number of characters the input can contain, while in numeric fields, it refers to the lowest accepted number.

Max

Works the same way as Min, but instead defines the maximum allowed value.

Whitelist

Allows you to create a list of the only values that will be accepted in that field. To input them, type each value and press enter, which will save and display them as tags in the configuration.

Unlike fields with options, the user will not see this list but will receive an error message clarifying the accepted values when entering an unapproved one.

Blacklist

Configured in the same way as Whitelist, but unlike this property, it allows you to define a list of values that will not be accepted in that field. The user can enter any data except those listed here.

Next, we will look at another type of more complex validations that allow for the analysis of specific data and, if certain conditions are met, prevent the form from being submitted and display a custom error message: Validation Expressions.

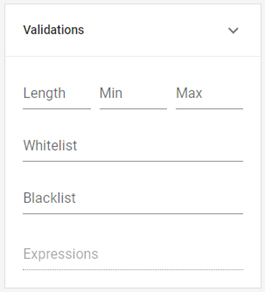
Validation properties